 Screen Online
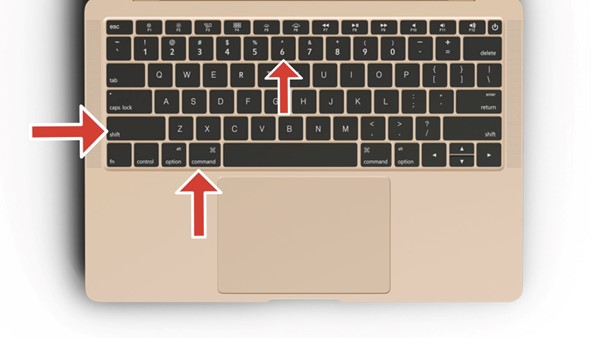
Taking screenshots on Mac is incredibly intuitive and powerful! Whether you're using the latest macOS Sonoma or an older version, Apple provides multiple built-in methods for capturing your screen. This comprehensive guide covers everything from basic shortcuts to advanced screenshot tools, and includes comparisons with PC screenshot methods.
🖼️ Quick Reference: Mac Screenshot Methods
| Method | Shortcut | Best For |
|---|---|---|
| Full Screen | Cmd + Shift + 3 |
Entire screen capture |
| Selected Area | Cmd + Shift + 4 |
Custom area selection |
| Window Capture | Cmd + Shift + 4 + Space |
Specific window |
| Touch Bar | Cmd + Shift + 6 |
Touch Bar capture |
| Screenshot App | Cmd + Shift + 5 |
Advanced options |
🎯 Method 1: Full Screen Screenshot
The simplest way to capture your entire screen:
Basic Full Screen
- Press
Cmd + Shift + 3 - Your screenshot is automatically saved to Desktop
- You'll hear a camera shutter sound (if sound is enabled)
Full Screen to Clipboard
- Press
Cmd + Shift + Ctrl + 3 - Screenshot is copied to clipboard (not saved to file)
- Paste with
Cmd + Vin any application
To disable the screenshot sound:
- Open System Preferences → Sound
- Uncheck "Play user interface sound effects"
- Or use Terminal:
defaults write com.apple.screencapture disableSound -bool true
To re-enable: defaults write com.apple.screencapture disableSound -bool false
🎯 Method 2: Selected Area Screenshot
Perfect for capturing specific parts of your screen:
Basic Area Selection
- Press
Cmd + Shift + 4 - Your cursor changes to a crosshair
- Click and drag to select the area you want
- Release to capture
Area Selection with Options
- Press
Cmd + Shift + 4 - While dragging, hold additional keys:
- Shift: Lock to horizontal or vertical
- Option: Resize from center
- Space: Move selection area
- Release to capture
Cancel Selection
- Press
Escto cancel the screenshot
🎯 Method 3: Window Screenshot
Capture a specific window with a beautiful drop shadow:
- Press
Cmd + Shift + 4 - Press
Space(cursor changes to camera icon) - Click on the window you want to capture
- The window is captured with a drop shadow effect
To remove the drop shadow:
defaults write com.apple.screencapture disable-shadow -bool true
killall SystemUIServer
To restore drop shadow:
defaults write com.apple.screencapture disable-shadow -bool false
killall SystemUIServer
Window highlighting:
- The window will be highlighted in blue when you hover over it
- Works with most applications and system windows
🎯 Method 4: Touch Bar Screenshot
For MacBook Pro users with Touch Bar:
- Press
Cmd + Shift + 6 - Touch Bar screenshot is saved to Desktop
- Shows the current Touch Bar content
🎯 Method 5: Screenshot App (macOS Mojave+)
The most advanced screenshot tool built into macOS:
Opening Screenshot App
- Press
Cmd + Shift + 5 - Screenshot toolbar appears at bottom of screen
- Choose your capture type:
- Capture Entire Screen
- Capture Selected Window
- Capture Selected Portion
Screenshot App Features
- Timer: Set 5 or 10-second delay
- Options: Choose save location, file format, and more
- Record Screen: Video recording capabilities
- Show Thumbnails: Preview screenshots before saving
Screenshot App Options
- Click Options in the toolbar
- Configure:
- Save to: Choose location (Desktop, Documents, etc.)
- Timer: 5 or 10-second delay
- Show Floating Thumbnail: Preview after capture
- Remember Last Selection: Reuse previous area
- Show Mouse Pointer: Include cursor in screenshot
🎯 Method 6: Terminal Screenshots
For advanced users, use the screencapture command:
Basic Terminal Screenshot
# Full screen
screencapture screenshot.png

# Selected area
screencapture -i screenshot.png

# Specific window
screencapture -w screenshot.png

# No shadow
screencapture -x screenshot.png
Advanced Terminal Options
# With timer
screencapture -T 5 screenshot.png

# Specific format
screencapture -t png screenshot.png

# Include cursor
screencapture -C screenshot.png
🔧 Customizing Screenshot Settings
Change Default Save Location
- Open Terminal
- Type:
defaults write com.apple.screencapture location ~/Pictures - Type:
killall SystemUIServer - Screenshots will now save to Pictures folder
Change File Format
# PNG (default)
defaults write com.apple.screencapture type png

# JPEG
defaults write com.apple.screencapture type jpg

# PDF
defaults write com.apple.screencapture type pdf

# Apply changes
killall SystemUIServer
Change File Naming
# Custom name format
defaults write com.apple.screencapture name "Screenshot"

# Apply changes
killall SystemUIServer
📱 Screenshot on iPad/iPhone (Related)
While not Mac-specific, here are the iOS screenshot methods:
iPhone/iPad Screenshot
- iPhone with Face ID:
Side Button + Volume Up - iPhone with Home Button:
Home + Power - iPad:
Top Button + Volume Up(orHome + Poweron older models)
iPad Pro with Apple Pencil
- Screenshot:
Apple Pencil + Power Button - Screenshot and Markup:
Apple Pencil + Power Button(hold)
🎨 Advanced Tips and Tricks
Screenshot with Cursor
# Include mouse cursor
defaults write com.apple.screencapture showCursor -bool true
killall SystemUIServer
Multiple Monitor Screenshots
Cmd + Shift + 3: Captures all displaysCmd + Shift + 4: Select area across multiple displays- Each display gets its own screenshot file
Screenshot Timestamps
Screenshots are automatically named with timestamps:
- Format:
Screenshot 2025-10-02 at 2.30.45 PM.png - Can be customized via Terminal commands
🔗 Related Tools
After taking your screenshot, you might want to:
- Test your MacBook screen colors - Verify color accuracy
- Check for dead pixels - Ensure your display is working properly
- Calibrate your MacBook display - Optimize display settings
- Test MacBook Pro orange screen issues - Diagnose display problems
📊 Comparison Table
| Feature | Keyboard Shortcuts | Screenshot App | Terminal |
|---|---|---|---|
| Ease of Use | ⭐⭐⭐⭐⭐ | ⭐⭐⭐⭐ | ⭐⭐ |
| Customization | ⭐⭐ | ⭐⭐⭐⭐⭐ | ⭐⭐⭐⭐⭐ |
| Speed | ⭐⭐⭐⭐⭐ | ⭐⭐⭐ | ⭐⭐⭐⭐ |
| Advanced Options | ⭐⭐ | ⭐⭐⭐⭐ | ⭐⭐⭐⭐⭐ |
| Learning Curve | ⭐⭐⭐⭐⭐ | ⭐⭐⭐⭐ | ⭐⭐ |
🎯 Quick Start Checklist
- Try
Cmd + Shift + 3for full screen - Test
Cmd + Shift + 4for area selection - Practice
Cmd + Shift + 4 + Spacefor windows - Explore
Cmd + Shift + 5for advanced options - Check your Desktop for saved screenshots
💡 Pro Tips
- Quick Area Resize: After
Cmd + Shift + 4, holdOptionto resize from center - Perfect Squares: Hold
Shiftwhile dragging for perfect squares - Move Selection: Hold
Spacewhile dragging to move the selection area - Multiple Screenshots: Take multiple screenshots quickly - they're all saved
- Screenshot App Timer: Use the 5-second timer for capturing menus
- Touch Bar Screenshots: Great for documenting Touch Bar interactions
- Terminal Automation: Create scripts for automated screenshots
🚨 Troubleshooting
Screenshots Not Working?
- Check Permissions: System Preferences → Security & Privacy → Privacy → Screen Recording
- Restart Screenshot Service:
sudo killall SystemUIServer - Check Storage Space: Ensure you have enough disk space
- Reset Screenshot Settings: Delete
~/Library/Preferences/com.apple.screencapture.plist
Screenshots Not Saving?
- Check Save Location: Verify the destination folder exists
- Permissions: Ensure you have write access to the save location
- File Conflicts: Check if files with the same name exist
🎉 Conclusion
Mac's screenshot capabilities are incredibly powerful and user-friendly. Whether you need a quick full-screen capture or precise area selection with advanced options, macOS provides the tools you need. Start with the basic keyboard shortcuts and gradually explore more advanced features as needed.
Remember: The best method depends on your specific needs. For quick captures, use keyboard shortcuts. For advanced control and options, use the Screenshot App. For automation, use Terminal commands.
Need help with other Mac screen-related tasks? Check out our screen testing tools for comprehensive MacBook display diagnostics.