 Screen Online
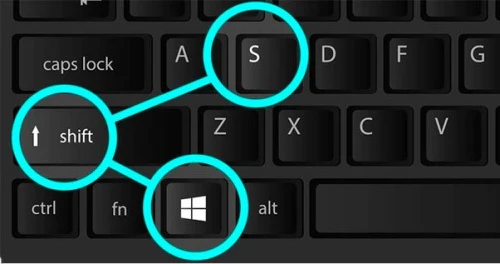
Taking screenshots on PC (Windows) is easier than you might think! Whether you're using Windows 10 or Windows 11, there are multiple ways to capture your screen. In this comprehensive guide, we'll cover all the methods from basic to advanced, perfect for anyone looking to learn how to screenshot on PC.
🖼️ Quick Reference: Windows Screenshot Methods
| Method | Shortcut | Best For |
|---|---|---|
| Print Screen | PrtScn |
Full screen capture |
| Alt + Print Screen | Alt + PrtScn |
Active window only |
| Windows + Print Screen | Win + PrtScn |
Full screen + save to file |
| Snipping Tool | Win + Shift + S |
Custom area selection |
| Game Bar | Win + G |
Gaming screenshots |
🎯 Method 1: Print Screen (PrtScn)
The most basic method that works on all Windows versions:
Full Screen Screenshot
- Press the Print Screen key (often labeled
PrtScnorPrtSc) - Open Paint, Word, or any image editor
- Press
Ctrl + Vto paste - Save your screenshot
Active Window Screenshot
- Click on the window you want to capture
- Press
Alt + Print Screen - Paste into your preferred application
The Print Screen key is usually located in the top-right area of your keyboard, often near the function keys. It might be labeled as:
PrtScnPrtScPrint ScreenPrtScn SysRq
On some laptops, you may need to press Fn + PrtScn to activate it.
🎯 Method 2: Windows + Print Screen
This method automatically saves your screenshot to the Pictures folder:
- Press
Windows + Print Screen - Your screen will briefly dim to indicate the capture
- Find your screenshot in
Pictures > Screenshots
File location: C:\Users\[YourUsername]\Pictures\Screenshots\
🎯 Method 3: Snipping Tool (Windows 10/11)
The Snipping Tool offers more control over what you capture:
Using the Snipping Tool App
- Press
Windows + R - Type
snippingtooland press Enter - Click New to start a new snip
- Select the area you want to capture
- Save or copy your screenshot
Using the New Snip & Sketch (Windows 10/11)
- Press
Windows + Shift + S - Choose your snip type:
- Rectangular Snip: Drag to select a rectangle
- Freeform Snip: Draw any shape
- Window Snip: Click on a window
- Fullscreen Snip: Capture entire screen
- Your screenshot is copied to clipboard
- Click the notification to edit or save
🎯 Method 4: Game Bar (Windows 10/11)
Perfect for gaming or when you need quick access:
- Press
Windows + Gto open Game Bar - Click the Screenshot button (camera icon)
- Or use
Windows + Alt + PrtScnfor instant capture - Screenshots are saved to
Videos > Captures
🎯 Method 5: Third-Party Tools
For advanced users, consider these powerful alternatives:
Built-in Alternatives
- Paint 3D:
Windows + R→mspaint→Ctrl + V - PowerShell: Use
Add-Typewith Windows API calls
Recommended Third-Party Tools
- Greenshot: Free, open-source screenshot tool
- Lightshot: Quick and easy screenshot sharing
- Snagit: Professional screen capture software
🔧 Troubleshooting Common Issues
Print Screen Not Working?
Check these common causes:
- Function Lock: Try
Fn + PrtScn - OneDrive Sync: Disable "Screenshot" sync in OneDrive settings
- Third-party Software: Some apps like Dropbox or OneDrive may interfere
- Keyboard Issues: Test the key in a text editor
Quick Fix:
- Restart your computer
- Update keyboard drivers
- Check Windows Update
Screenshots Not Saving?
Common solutions:
- Check the Screenshots folder permissions
- Ensure you have enough disk space
- Try a different save location
- Run Windows as administrator
📱 Screenshot on Windows Tablets
If you're using a Windows tablet:
- Surface devices:
Power + Volume Down - Other tablets:
Windows + Volume Down - Touch: Use the Snipping Tool with touch input
🎨 Advanced Tips
Customizing Screenshot Settings
- Change save location: Right-click Screenshots folder → Properties → Location
- File format: Screenshots are saved as PNG by default
- Naming: Windows auto-names files as "Screenshot (1).png"
Keyboard Shortcuts Summary
PrtScn              → Copy full screen to clipboard
Alt + PrtScn        → Copy active window to clipboard
Win + PrtScn        → Save full screen to file
Win + Shift + S     → Open Snipping Tool
Win + G             → Open Game Bar
🔗 Related Tools
After taking your screenshot, you might want to:
- Test your screen colors - Verify color accuracy
- Check for dead pixels - Ensure your display is working properly
- Calibrate your monitor - Optimize display settings
📊 Comparison Table
| Feature | Print Screen | Snipping Tool | Game Bar |
|---|---|---|---|
| Ease of Use | ⭐⭐⭐⭐⭐ | ⭐⭐⭐⭐ | ⭐⭐⭐⭐ |
| Customization | ⭐⭐ | ⭐⭐⭐⭐⭐ | ⭐⭐⭐ |
| File Saving | Manual | Manual/Auto | Auto |
| Editing | External | Built-in | Basic |
| Gaming | ⭐⭐ | ⭐⭐ | ⭐⭐⭐⭐⭐ |
🎯 Quick Start Checklist
- Try
PrtScnfor basic full-screen capture - Use
Alt + PrtScnfor active window - Test
Win + Shift + Sfor custom areas - Check your Screenshots folder location
- Practice with different methods
💡 Pro Tips
- Multiple Monitors:
PrtScncaptures all monitors,Alt + PrtScncaptures the active window - Delayed Screenshot: Use Snipping Tool's delay feature for capturing menus
- Quick Edit:
Win + Shift + S→ Edit in Snip & Sketch - Gaming Screenshots: Game Bar works best for full-screen games
- Bulk Screenshots: Use
Win + PrtScnfor multiple quick captures
🎉 Conclusion
Windows offers multiple screenshot methods to suit every need. Whether you need a quick full-screen capture or precise area selection, there's a method that works for you. Start with the basic PrtScn method and gradually explore more advanced options as needed.
Remember: The best method depends on your specific needs. For quick captures, use keyboard shortcuts. For precise control, use the Snipping Tool. For gaming, use the Game Bar.
Need help with other screen-related tasks? Check out our screen testing tools for comprehensive display diagnostics.